En este post, I’ll break down everything: Who needs it, what it does, why it matters, and how to use it like a pro. Más, I’ll share compatibility tips and common mistakes to avoid.
Who Needs a Yamaha Label Feeder?
If you’re runningSMT production linesfor industries like:
Automotive electronics (traceability is law here)
Medical devices (FDA requires full lifecycle tracking)
Industrial control systems (where uptime matters)
…then this is for you.
Still usingmanual labeling after reflow? That’s a bottleneck. Labels get crooked, operators miss parts, and you waste hours reworking boards.
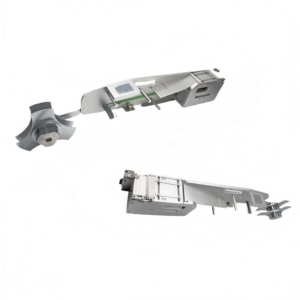
A Yamaha Label Feeder lets yourexisting SMT machine apply labels during placement, so your operators don’t waste time later.
Think of it as afeeder that serves labels instead of components. The SMT machine picks labels like it picks chips, and places them on the PCB with micrometer accuracy.
Core Features
✔Automated Labeling– Skip the manual stickering after reflow. ✔Alta precisión– Uses the SMT head for dead-on placement. ✔Plug-and-Play Integration– No extra power. No complicated protocols. Just connect to the vibratory feeder port and set it as aTray Feederin the machine.
Supported Label Sizes:
Parameter
Range
Length/Height
2–80 mm
Espesor
≥ 0.05 milímetro
Backing Width
4–88 mm
Why Do You Need One?
Simple: Eficacia, Exactitud, Compliance.
✅Efficiency Gains
Yamaha YSM20 can hit30,000 CPH. Humans can’t keep up. Automating labeling shaves minutes (or hours) off every batch.
✅Traceability = Compliance
Labels carry serial numbers, barcodes, and lot codes. Automotive and medical standards require this. Skip it, and you risknon-compliance penalties.
✅Fewer Errors = Lower Cost
Manual work means crooked labels, missed boards, and rework. That’s expensive.
✅Space and Money Saved
No extra labeling machine. The SMT line does it all.
How to Choose and Use a Yamaha Label Feeder
Paso 1: Check Compatibility
Match your SMT machine model and feeder slot width (usually 8mm/12mm).
Paso 2: Pick the Right Labels
Usehigh-temp labels (polyimide) so they survive reflow.
Confirm size fits feeder spec (2–80 mm).
Paso 3: Setup in Your SMT Program
Configurepickup height y placement pressure.
Run peel tests to avoid misfeeds.
Paso 4: Maintain It
Clean peel blades and rollers to remove adhesive build-up.
Check for worn feeding gears if labels start jamming.
Common Applications
PCB Identification– Barcodes for MES and traceability.
Component Tagging– Mark large or sensitive components.
Tray & Carrier Labels– Track WIP across stations.
Manual vs Automated Labeling: Quick Comparison
Factor
Manual Labeling
Label Feeder
Velocidad
Slow (operator-limited)
High-speed (machine-driven)
Exactitud
Prone to misalignment
Perfect placement
Labor Cost
Alto
One-time investment
Trazabilidad
Risky
Guaranteed
Pro Tips Before You Buy
Confirm Feeder Protocol: Yamaha uses vibratory feeder interface. No extra software needed—just signal lines likesend label y label ready.
Plan for Label Rolls: Standard core sizes fit easily, but check diameter limits.
Budget for Training: Even though setup is simple, train operators on peel force adjustments.
Conclusión
Yamaha Label Feeders aren’t a luxury—they’re the next step if you wantvelocidad, exactitud, and complianceon your SMT line. Instead of wasting time on manual labeling, let your pick-and-place do the heavy lifting.
Preguntas Frecuentes
Q1: Can I use this with non-Yamaha machines? Sí! We support Panasonic, Fuji, Samsung, Universal, Hitachi, and ASM models.
Q2: What label materials are best? Polyimide or other high-temp labels for reflow durability.
Q3: Do I need extra power? No. It uses the standard feeder interface for power and control.
Q4: How long does setup take? Usually less than 30 minutes if your machine program is ready.
Q5: Can it handle QR codes? Absolutely. Any label that fits the size spec works.